How the Two Apps Work Together
Oralable is a two-app system designed for collaboration between consumers and professionals.
Oralable (Consumer)
Temple vitals and overnight sessions on your iPhone
- Connect to device
- Record sessions
- View your data
- Export CSV / PDF
Oralable for Professionals
Later — CSV import for researchers and coaches. Not Beacon Day-1
- Import participant data
- Manage multiple participants
- Analyze sessions
- Track progress over time
Contents
Setup: Consumer & Professional Workflow
This section explains how a professional (therapist, researcher, coach) and their client/participant should set up Oralable for collaborative monitoring.
For Professionals: Setting Up a New Participant
- Download Oralable for Professionals from the App Store on your device
- Sign in to create your professional account
- Instruct your participant to download the consumer Oralable app
- Wait for them to record sessions and share data with you
- Import their CSV file when received
- Review their sessions during appointments
For Consumers: Sharing Data with Your Professional
- Download Oralable from the App Store
- Connect your Oralable device (or use Demo Mode to practice)
- Record sessions as directed by your professional
- Go to Share tab and select the sessions to share
- Tap Share CSV and send via Email, AirDrop, or Files
- Your professional will import and review your data
Quick Reference: Who Does What
| Task | Consumer App | Professional App |
|---|---|---|
| Connect to Oralable device | ✓ | — |
| Record sessions | ✓ | — |
| View own history | ✓ | — |
| Export/Share CSV | ✓ | — |
| Import participant CSV | — | ✓ |
| Manage multiple participants | — | ✓ |
| Review participant sessions | — | ✓ |
| Demo Mode (testing) | ✓ | ✓ |
Example Scenario: Speech Therapy
Sarah is a speech therapist. Tom is her patient working on jaw relaxation exercises.
- Session 1: Sarah explains Oralable and helps Tom install the consumer app and pair his device
- At home: Tom records 10-minute sessions during his daily exercises
- Before Session 2: Tom shares his week's recordings as a CSV via email
- Session 2: Sarah imports Tom's CSV into her Professional app and reviews his progress together
- Ongoing: Tom continues recording, Sarah tracks improvement over weeks
Sharing Methods
The consumer can share their CSV data via:
- AirDrop — Fastest for in-person handoff
- Email — Best for remote sharing
- Files app — Save to iCloud Drive, Dropbox, etc.
- Messages — Quick sharing via iMessage
1. Getting Started
Oralable monitors muscle activity using PPG (photoplethysmography) sensor technology. The app works with the Oralable Bluetooth device, or you can explore all features using Demo Mode.
Requirements
- iPhone with iOS 16.0 or later
- Oralable Bluetooth sensor (optional with Demo Mode)
- Bluetooth enabled
First Launch
- Download Oralable from the App Store
- Open the app and review the welcome screens
- Grant Bluetooth permission when prompted
- Start exploring with Demo Mode or connect your device
2. Demo Mode
Demo Mode simulates a connected Oralable device with realistic muscle activity data. Use it to explore the app without hardware.
Enabling Demo Mode
- Go to the Settings tab
- Toggle Demo Mode on
- Return to Dashboard
- See "Demo Mode Active" banner and live data
What Works in Demo Mode
- Real-time waveform display
- Recording sessions
- Viewing history
- Sharing data as CSV
3. Connecting Your Device
Before Connecting
- Charge your Oralable device
- Enable Bluetooth on your iPhone
- Disable Demo Mode if enabled
Pairing Steps
- Turn on your Oralable device (green LED — never red or blue)
- Go to the Devices tab
- Tap Scan for Devices
- Select Oralable from the list
- Wait for connection (streaming starts; status LED follows firmware, not a solid red/blue)
- Return to Dashboard to see live data
Connection Status Indicators
- Green dot — Connected and streaming
- Gray dot — Not connected
- Orange dot — Demo Mode active
4. Dashboard
The Dashboard shows temple vitals (heart rate, SpO₂) and device state from your connected sensor or Demo Mode.
Dashboard Elements
- Connection Status — Device status at the top
- PPG IR Card — Current muscle activity value and sparkline
- Record Button — Start/stop recording
- Timer — Elapsed recording time
Dashboard readings (Phase 0)
- Heart rate / SpO₂ — temple vitals when coupling is good
- IR pulse — used for worn detect and pulse quality
- Clench / grind event labels in the patient UI come later (Phase 1+)
5. Recording Sessions
Device positioning
The app reports honest device state: on the case, on the bench, or worn. Automatic worn uses the infrared pulse, not die temperature. Seat the optical window on the temple (anterior temporalis bulge when you clench) until the app shows worn and live PPG.
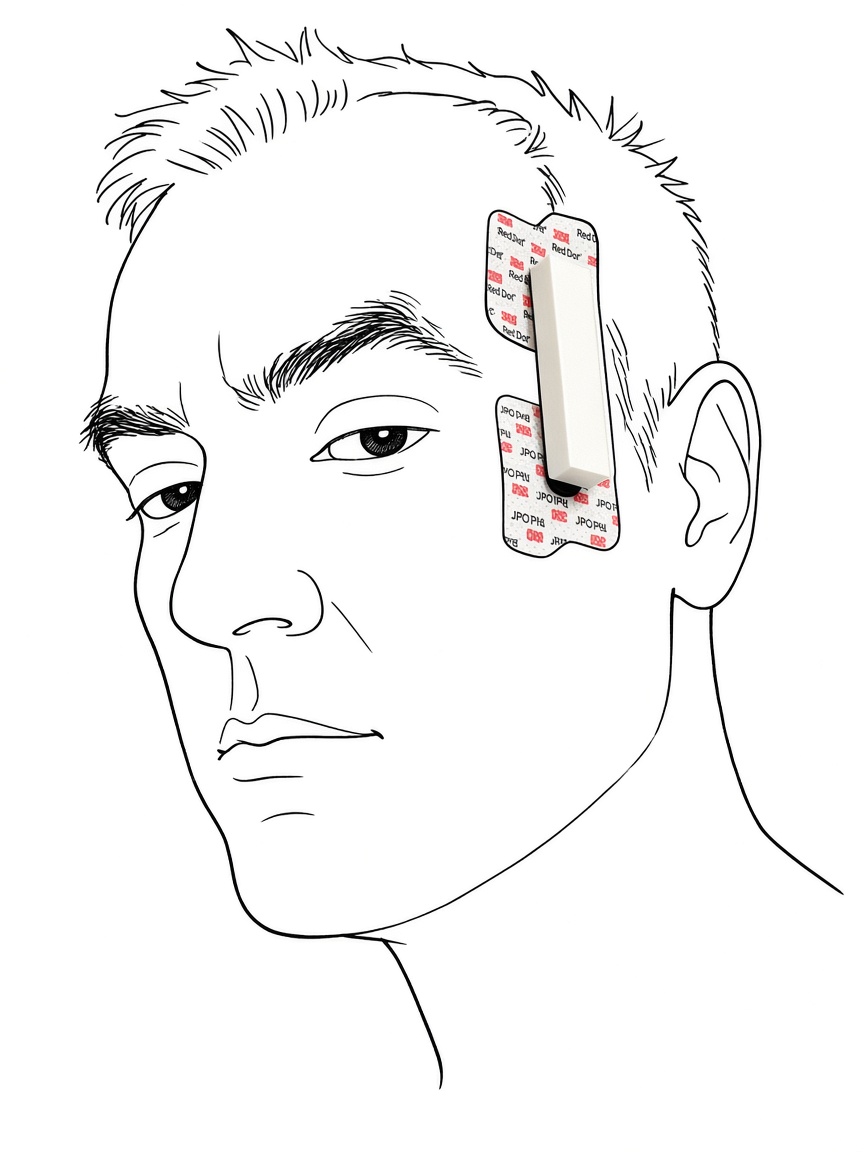
Placement & recording (Vitals Phase 0)
Current pilot focus is temple / temporalis heart rate and SpO₂ with honest device state in the app. Seat the clip on the temple, connect in the Oralable app, and allow automatic recording once the device is ready. Legacy 15-second muscle-calibration flows are not required for vitals Phase 0.
- Charge the clip in the Oralable charging case (USB-C to the case; not Qi / MagSafe)
- Place the sensor for temple / temporalis coupling
- Connect in the app and confirm device status (worn / battery / LED mirror)
- Start or allow an automatic recording session
Starting a Recording
- Ensure device is connected or Demo Mode is enabled
- Tap Record (or wait for automatic session start when ready)
- Confirm live PPG / vitals update in the dashboard
- Continue normal activities or sleep as directed by your protocol
Stopping a Recording
- Tap the Stop button
- Recording saves automatically
- Find it in the History tab
Recording Tips
- Record for at least 5–10 minutes to capture patterns
- Overnight bands unlock after about 1 hour worn; aim for ≥6 hours (goal 8) for a full night view. Beacon clinic nights target ≥4 hours
- Keep device properly positioned
- Note significant events for reference
Overnight state hypnogram
After a long overnight wear, the patient app can show a state hypnogram — a barcode-style view of device-inferred quiet / tonic / phasic / rescue / recovery patterns across the night. It appears on the Dashboard (morning card) and as a preview on the Share tab. This is the primary overnight graphic for personal awareness.
- Open Dashboard after an overnight session to see band chips (unlock after ≥1 h worn) plus the hypnogram
- Open Share → Clinical report section for the same hypnogram preview
- Export Clinical Temporalis PDF for the full pack (hypnogram + hourly detail + event CSV)
6. Viewing History
The History tab displays all recorded sessions.
Navigating History
- Tap the History tab
- Browse sessions (newest first)
- Tap a session to view details
Session Details
- Date and time of recording
- Duration
- Interactive chart (scroll and zoom)
- Metric selector tabs
Available Metrics
| Metric | Description | Status |
|---|---|---|
| IR (PPG) | Primary muscle activity signal | Available |
| Heart Rate | Derived from temple PPG (Phase 0) | Available |
| SpO2 | Blood oxygen estimate (Phase 0) | Available |
| Overnight hypnogram | Device-inferred quiet / tonic / phasic / rescue / recovery (Dashboard + Share) | Available |
| Movement | Accelerometer (CSV / research) | In CSV export |
| Temperature | Skin temperature | Coming Soon |
7. Sharing Data
Share recorded data as CSV or as a Clinical Temporalis PDF (hypnogram-first overnight pack). The Share tab also previews the overnight state hypnogram after a long wear night.
How to Share
- Go to the Share tab
- Select date range (Today, This Week, This Month, or Custom)
- Tap Share CSV, or export Clinical Temporalis PDF for the overnight pack
- Choose method: AirDrop, Email, Files, etc.
CSV Contents
- Timestamp per data point
- PPG values (IR, Red, Green)
- Accelerometer (X, Y, Z)
- Temperature
- Device ID
8. Settings
Current Settings
| Setting | Description |
|---|---|
| Demo Mode | Enable simulated device data |
| About | Version, privacy policy, terms |
Coming Soon
- Subscription management
- Health Integration (Apple Health)
- Detection settings
- CloudKit sharing
9. Oralable for Professionals
Oralable for Professionals is planned after Phase 1+. It is not part of the current Beacon clinic kit. The notes below describe the intended workflow when it opens.
Getting Started
- Download Oralable for Professionals from the App Store
- Sign in to create your account
- Enable Demo Mode to explore, or import participant data
Demo Mode (Professional)
Shows a sample participant with three pre-recorded sessions.
- Go to Settings
- Toggle Demo Mode on
- Return to Participants to see "Demo Participant"
- Tap to view sessions and charts
Importing Participant Data
- Participant shares CSV from their Oralable app
- Tap Import CSV
- Select the file
- Participant appears in your list
- View and analyze their sessions
Use Cases
- Speech Therapy — Monitor jaw tension during exercises
- Research — Collect objective muscle data
- Sports — Track muscle tension patterns
- Wellness — Monitor biofeedback progress
10. Feature Roadmap
Current Features
| Feature | Consumer | Professional |
|---|---|---|
| Demo Mode | ✓ | ✓ |
| Device Connection | ✓ | — |
| Real-time PPG Display | ✓ | — |
| Session Recording | ✓ | — |
| History View | ✓ | ✓ |
| CSV Share/Import | ✓ | ✓ |
| Participant Management | — | ✓ |
In the app today
- Temple vitals (HR / SpO₂) with device status
- Overnight state hypnogram (Dashboard + Share preview)
- Clinical Temporalis PDF export (hypnogram-first)
- CSV export
Coming Soon
- Phase 1+ muscle / IR-DC UX
- Oralable for Professionals (after share gate)
- CloudKit share codes
- Apple Health integration polish
Later
- Apple Watch companion app
- ANR M40 EMG device support (research path)
2027+
- Medical device certification pathway
- Clinical integrations